Drywall is a crucial component of any home, providing structural support and a smooth surface for walls and ceilings. However, it is not immune to damage, such as cracks, dents, and holes. Fortunately, with a little know-how and some basic tools, you can easily patch and repair drywall like a pro. In this comprehensive guide, we will walk you through the process of drywall repair, covering everything from small dents and holes to larger damaged areas. So, let’s roll up our sleeves and get started!
Before You Begin: Gathering the Tools and Materials
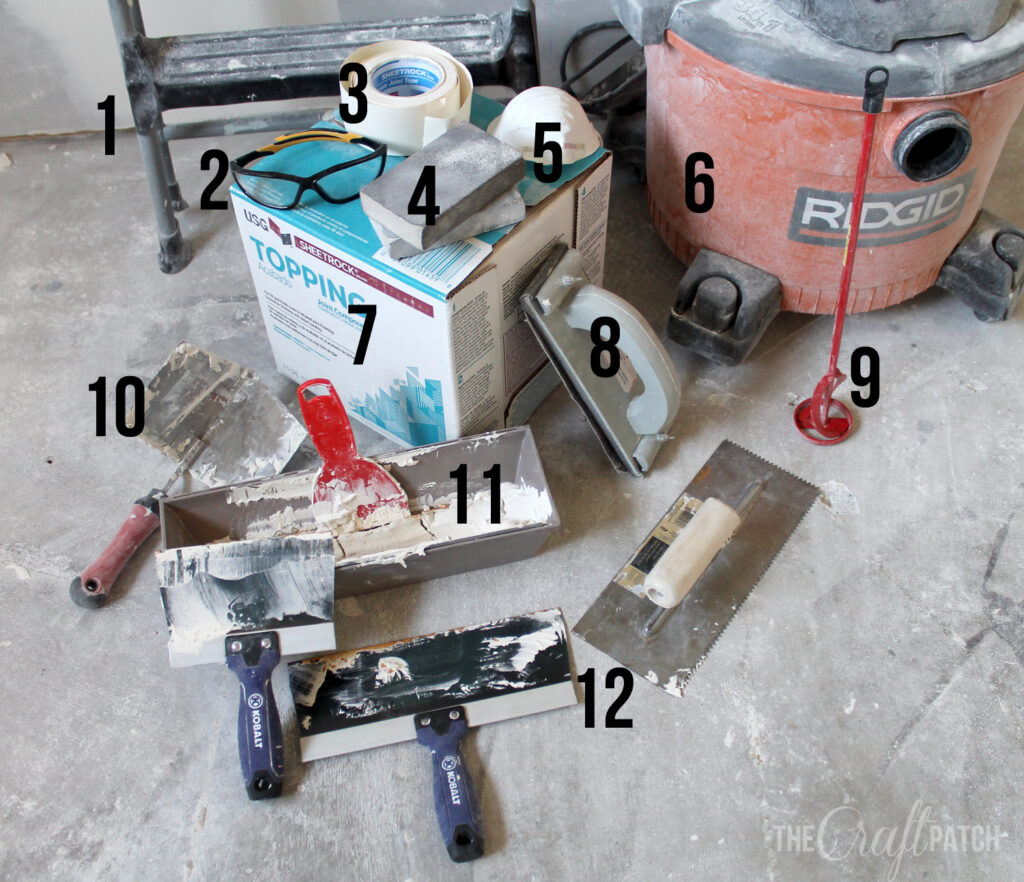
Before diving into the actual repair process, it’s important to make sure you have all the necessary tools and materials on hand. Here’s a list of what you’ll need:
Tools
- Drill
- Drywall Saw
- Utility Knife
- Drywall/Taping Knives
- Tape Measure
- Scissors
- Dust Mask
- Eye Protection
- Work Gloves
- Snips
- Stud Finder
- Putty Knife
- Speed Square
- Hack Saw
- Hammer
- Paint Brush & Roller
- Stiff Brush
- Drywall Mud Pan
Materials
- Construction Adhesive
- Drywall Tape
- Masking Tape
- Drywall Screws
- Joint Compound
- Drywall Patch Kit
- Drywall Scraps
- Drywall Patch Plaster
- Drywall Screen
- Sanding Sponge
- Corner Bead
- Spackling Compound
- Wall Texture Compound
- Furring Strips
- Primer
- Interior Paint
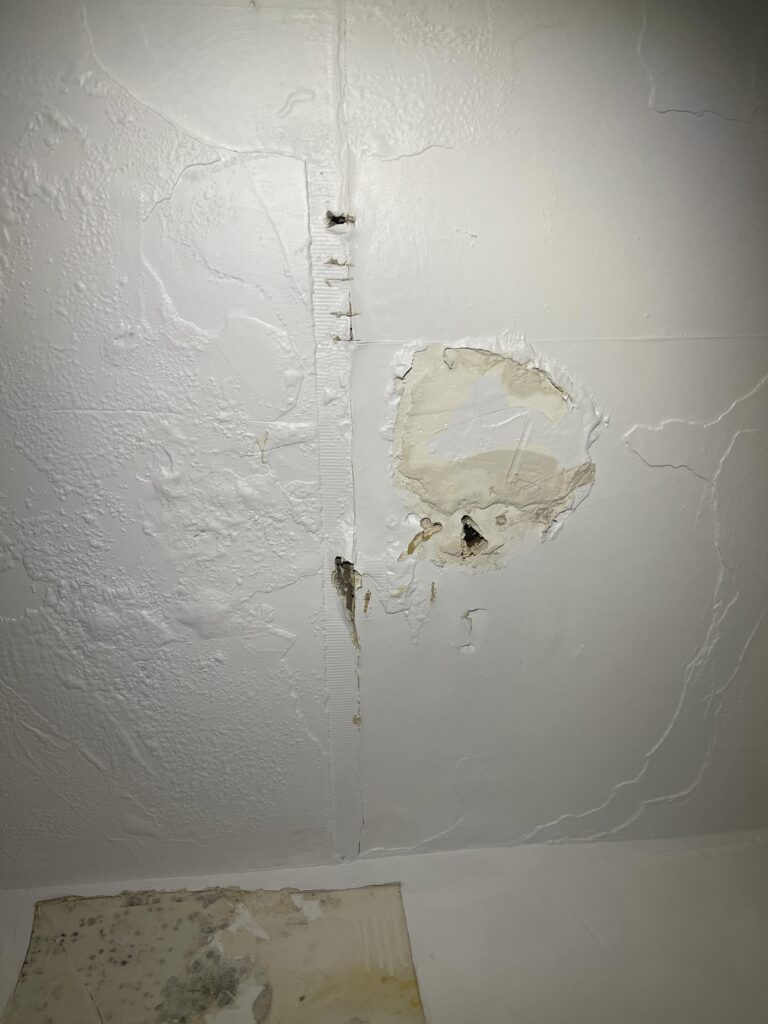
Understanding the Different Types of Drywall Damage
Drywall damage can range from small dents and holes to larger cracks and damaged areas. Before initiating any repair work, it’s essential to identify the type of damage you’re dealing with. Here are the common types of drywall damage and how to address them:
Patching Small Dents and Dings
Small dents and dings are relatively easy to fix. Follow these steps to repair them:
- Scrape away any loose debris from the dent or ding.
- Apply a fast-drying spackle to fill the dent or ding, ensuring it is level with the surrounding wall surface.
- Allow the spackle to dry as per the manufacturer’s instructions.
- Sand the repaired area smooth using a sanding sponge.
- Wipe away any dust and touch up the paint to match the surrounding wall.
Repairing Popped Nailheads
Popped nailheads occur when a nail becomes loose and backs out of the drywall, creating a visible bump. Here’s how to fix them:
- Reattach the drywall to the stud by driving a drywall screw 1 1/2 inches above the popped nailhead into the stud. Sink the screw head just below the surface of the drywall.
- Drive the popped nail back into the wall.
- Cover both the sunken screw head and the popped nail with spackle until they are level with the wall surface.
- Allow the spackle to dry and then sand the area smooth.
Fixing Small Holes Using a Patch Kit
For small holes, such as those caused by a doorknob, a patch kit can be used. Follow these steps:
- Place a self-adhesive mesh patch over the hole.
- Use a drywall knife to cover the patch with spackling compound or lightweight joint compound in a crisscross pattern, feathering the edges to blend with the wall.
- Apply a second coat of compound if necessary and sand the area smooth.
Patching Medium Holes Using the California Patch Method
For holes up to 6 inches in diameter, the California Patch method is effective. Here’s how to do it:
- Cut a piece of drywall into a square shape that’s 2 inches larger in width and height than the hole.
- Score the back of the drywall about an inch from each side and snap off the gypsum, leaving the paper backing intact.
- Hold the patch over the hole and trace around the gypsum square. Cut out the traced square with a drywall saw.
- Apply joint compound to the back of the paper border, fit the gypsum into the new hole, and press the paper edges coated with joint compound into place along the outside edge of the hole.
- Cover the entire patch with joint compound, feathering the edges. Allow the compound to dry, sand it smooth, and apply a second coat if needed.
Repairing Larger Holes
For holes larger than 6 inches in diameter, a different approach is needed. Follow these steps to repair larger holes:
- Cut out a piece of drywall that is slightly larger than the hole.
- Trace the patch size over the hole and cut along the lines with a drywall saw.
- Attach furring strips inside the hole on each side using screws.
- Screw the patch to the furring strips, ensuring it is flush with the existing drywall.
- Apply joint tape to the borders of the patch and cover it with joint compound, feathering the edges. Allow the compound to dry, sand it smooth, and apply a second coat if needed.
Repairing Damaged Corner Bead
Corner bead is used where two pieces of drywall meet to form a corner. Here’s how to repair damaged corner bead:
- Cut through the damaged corner bead horizontally, both above and below the mar, with a hack saw.
- Use a utility knife to cut vertically along the drywall, connecting the top and bottom cuts from the hack saw on the left and right sides. Remove the damaged piece.
- Snip a new piece of corner bead to fill the gap and attach it to the wall with nails or the manufacturer’s recommended fastener or adhesive.
- Apply joint compound to both sides of the corner, covering the bead patch to smooth rough edges and cover any seams. Let it dry and sand it smooth.
Finishing Touches: Making Your Repair Seamless
Once you have completed the repair work, it’s time to add the finishing touches to ensure a seamless result. Follow these steps:
- Lightly sand the repaired area to ensure a satin smooth finish and seamless blending with the surrounding wall.
- Apply a coat of primer to the repaired area and let it dry.
- Paint the wall, matching the color to the existing paint.
Additional Tips and Considerations
Here are some additional tips and considerations to keep in mind during the drywall repair process:
- Decide whether you want to repaint the entire wall or just touch up the patched areas. For small nail holes, you can cover the repairs by dabbing touch-up paint with a soft cloth.
- If you’re patching a large number of holes or other damage, prime the patched walls before repainting, especially if you’re choosing a semi-gloss or shinier finish. The higher the gloss, the more noticeable differences in surface textures become between the patch and the surrounding paint.
- Before you begin any repair work, it’s important to know the utility placement in your home. Typically, electric wires are attached to wall studs. Locate the studs before cutting, drilling, or nailing drywall.
- Wear protective clothing, work gloves, goggles, and a dust mask when working with drywall.
- If you’re unsure about tackling a particular repair or if the damage is extensive, it’s always best to consult a professional drywall contractor.
Drywall repair may seem like a daunting task, but with the right tools, materials, and techniques, you can achieve professional-looking results. Whether you’re dealing with small dents and holes or larger damaged areas, this comprehensive guide has provided you with the knowledge and step-by-step instructions to successfully patch and repair drywall. Follow the outlined steps, take your time, and soon you’ll have smooth, flawless walls and ceilings in your home. Happy repairing!
Disclaimer: The information provided in this article is for educational purposes only. Always exercise caution when working with tools and follow the manufacturer’s instructions for any products used.